Privilege 2.0 Guide
***The New Privilege Application was made available
April, 2026. If you are using an older
plug-in, please go to the other legacy version of Privilege Review Help for
assistance.
eDiscovery
AI Privilege Review
Privilege review is one of the most time intensive and
important aspects of document review. Identifying and
withholding or redacting privileged documents usually requires a substantial
review team, scrutinizing tens or hundreds of thousands of documents,
usually hitting on a very broad search term screen of various
attorney names and terms implying potential privilege. eDiscovery AI’s
privilege application can
review, identify privilege and draft a privilege log entry
based on your instructions and customized input.
Before
Submitting Documents
Create separate fields for the following items, all of
these fields are required to submit documents for Privilege
review.
(1) Privilege Classification (Single Choice)
(2) Privilege Type (Multi Choice)
(3) Attorney List (Long Text)
(4) Privilege Explanation (Long Text)
(5) Privilege Log Entry Field (Long Text)
Select the documents eligible for privilege
review and use the mass action Send to eDiscovery AI
From the
Select Job Type list, click Privilege, then click Next.
Note, if you do not see a popup window double check that
any popup blocking feature on your browser is set to allow popups from your
Relativity instance.
What follows below is a step by step of each of the
individual inputs used for Privilege Review.
Load Settings
The Load Settings button will allow you to automatically
populate the settings, prompts, and results fields used from previous jobs.
Click the Select Previous Job drop down to see a list of previous jobs
submitted. The “Review PDFs as Images” option won’t carry over—you’ll need to
check it manually. Custom Privilege Types are not currently carried over from
previous jobs and must be re-added manually.
Review PDFs as Images
eDiscovery AI can process both extracted text documents and
image documents. For PDFs, by default the extracted text is used. However, you
have the option to pull the information eDAI analyzes directly off the image
itself. This is particularly beneficial in various situations:
· Scanned documents, particularly if the OCR extracted text
isn’t very good or non-existent.
· Script handwriting analysis, or handwritten notes.
· Landscaped documents where OCR regularly fails.
General instructions
This is where one can enter the general directions as to
how they want Privilege handled for classification. Instructions on how narrow
or broad to treat it, whether footers should be included or
ignored, and whether various targeted documents should be included can be added
here.
Privilege Types
Privilege Types refers to what types of Privilege you would
like eDiscovery AI to consider in its review and the definitions used to
classify those types. There are two
default options available, which only need to be checked if you wish for
eDiscovery AI to identify and tag them accordingly:
Attorney Client Privilege
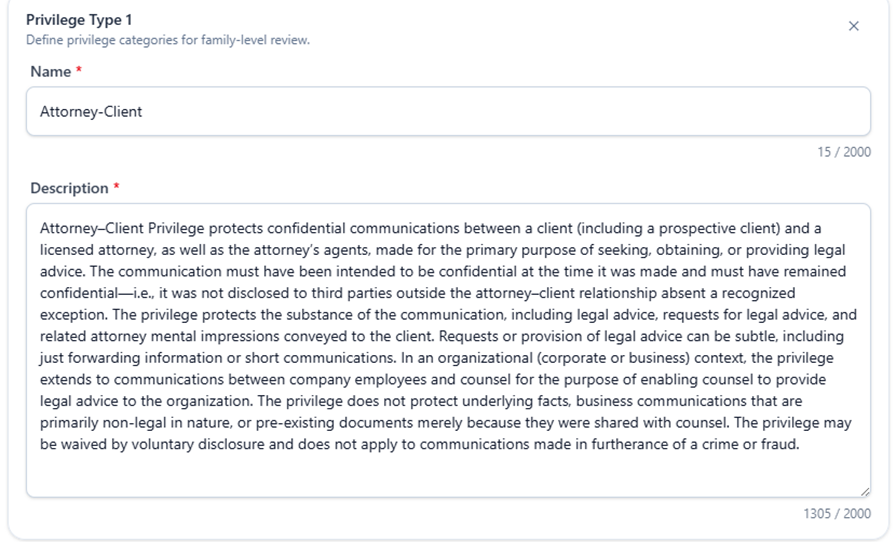
Attorney/Client will apply the eDiscovery AI Attorney
Client Communication Privilege prompt to the documents. Above is the default, generalized
description of Attorney-Client Privilege. If you would prefer a more customized
definition of Attorney Client privilege to be applied, you are free to edit the
definition as you deem necessary.
Work Product
Work Product will apply the eDiscovery AI Work Product prompt to the documents. Above is the default, generalized description of Work Product. If you would prefer a more customized definition of Work Product be applied, you are free to edit the definition as you deem necessary.
Additional Privilege Types
One can create additional Privilege Types on a submission
basis by clicking the “+Add Privilege Type” button in the lower
right side of the Privilege Types section.
This will add another entry area for you to Name and provide a
Description for any additional Privilege Types.
Attorney List
Attorney List
Please enter a list of
attorneys or law firms which will help eDiscovery AI identify and
appropriately label documents as privileged. The more comprehensive the list
is, the better the system will be at identifying privileged materials. No
special formatting or terms and connectors are needed for this list. Please
note that if you use generic terms such as “attorney” or “general counsel” on
the privilege list, then people associated with those terms within the
documents may be listed on the Attorney List Field output even if not
explicitly included (e.g., “John Doe, Attorney” may result with “John Doe”
being listed on the Attorney output even though he is not listed).
Attorney List Instructions
Attorney List Instructions
This is
where the instructions of how one would like the individual attorney names
output to the Attorney Field can be addressed. One can specify a limit on attorney names per document,
whether new attorneys found (not named in the Attorney List) should have an
asterisk next to their names, and other ways to format names in this field.
Log Configuration And Picklist
The Log Configuration section is where one enters instructions of how you would like your Privilege Log Entry constructed.
Various rules, examples and specified texts can be included directly to this section in an organized
format. These rules can be used separately or in conjunction with picklists. If a
picklist is used, any specific rules for various options can still be included
to the respective Log Configuration rule, but the Picklist will contain the various options available.
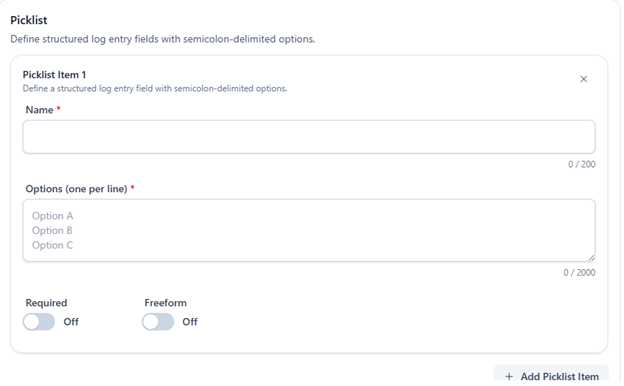
One can create up to six different picklists to choose from
in supplementing the Log Configuration.
References to Picklists in the Log Configuration should specify the NAME
of the Picklist (not the Picklist Number). Within the "Options" section, all possible options you would like for that particular section of the Privilege Log Entry should be included, with a semicolon at the end of each option, and only one option per line. Any guidance for which option is appropriate can be maintained within the Log Configuration section.
· Best Practice Tip:
Capitalize the entire name of the Picklist.
Then when you reference it in the Log Configuration section, capitalize
it there as well. It will make the organization easier to follow for both you
and the LLMs.
If an option from the picklist is required for the privilege log, select
the “Required” toggle. If the options for the picklist are more
freeform, where you don’t have specified options and just want the AI to create
the specific content, select “Freeform.”
Result Mapping
This is where one would specify which fields the
results of your eDiscovery AI Privilege Review run should be populated. All of these (with the exception of the Family
Identifier Field) should have been created prior to the “Before Submitting
Documents” section of the instructions.
a. Family Identifier Field. The field the AI Classifier can use to
identify family groupings.
b. Privilege Classification. The
field identifying whether a document was found to be privileged or not
privileged accordingly.
c. Privilege Type. The
type(s) of privilege identified within the document, as determined by your
descriptions for the various privilege types.
d. Attorney List. The
list of attorneys found within the document in the format described in the
“Attorney List Instructions” section.
e. Privilege Log. The
Privilege Log entry as defined by the instructions within the Log Configuration
and Picklist sections.
f. Privilege Explanation. An AI
generated description as to why the document was identified as privileged given
the instructions.
Submitting Documents and Viewing Results
Once all the forementioned sections are entered, you can
click “Next.” That will
take you to a confirmation page, reiterating all the content and rules that
were entered. If all looks correct,
click “Submit.” You should
get confirmation the job was submitted.
· Best Practices Tip: It is
always a good idea to Print this page to PDF to maintain a record of the
submission for future reference. That
button can be found at the top right of the page. [Printer icon]
Once eDiscovery AI completes its analysis and
populates the fields identified, you should see and be able to use the
results in the same way as any other field in Relativity such as searching
and exporting for a privilege log.
·
Best Practices Tip:
It is a good idea to incorporate these fields
into a view or a layout for which you will be considering and QCing the
results.
Important
Considerations
While eDiscovery AI is incredibly effective, it’s still
recommended that attorneys conduct QC on the results. Some QC steps to
consider:
· Any document lacking any respective privilege elements
should be considered for QC and manual review. It is likely that some of these
may require redaction or are no longer privileged; that decision should come
from the attorney, not the AI model.
· A percentage of documents hitting on various terms or names
should be considered for sampling and review. If something is consistently
categorized incorrectly, you may want to search on all such documents or revise
prompt instructions.
· Priv Log Entries should be reviewed for grammar, context
and quality, and edits made accordingly.
· If results are consistently overinclusive or
underinclusive, please advise your provider and the possibility of either
narrowing or broadening the prompts respectively.
Privilege
checks are always an important part of any review and production process.
It is recommended that conducting an eDiscovery AI sweep across your potential
production set to ensure no privileged documents are disclosed is a sound best
practice and good QC check for your production
processes.